One and Two point Perspective GeoGebra Labs
One Point
|
Two Point
|
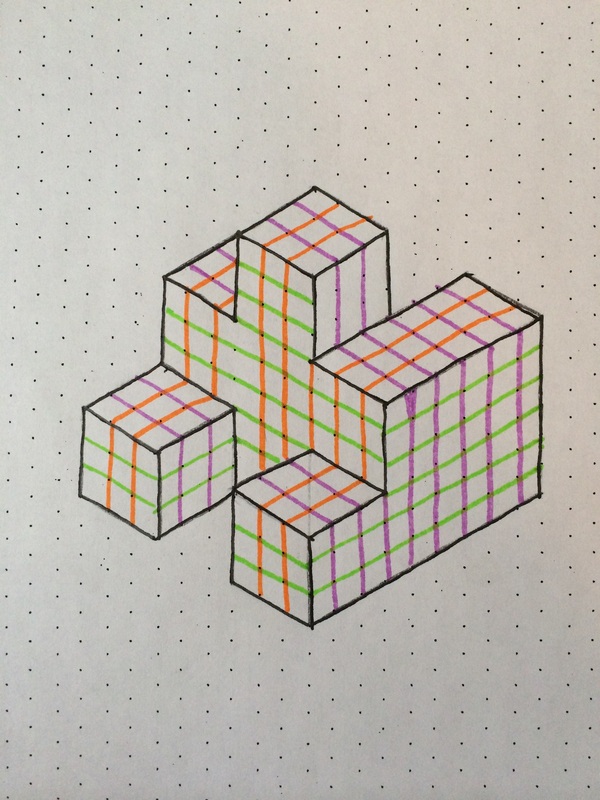
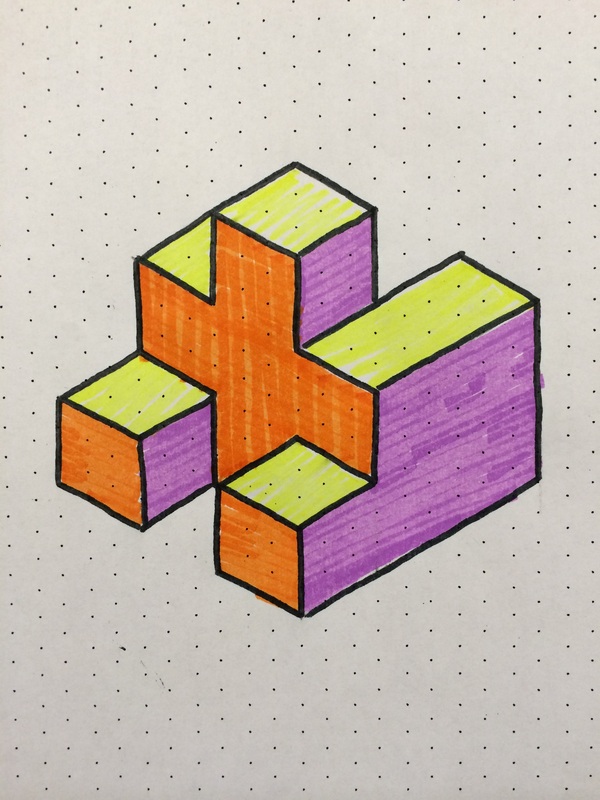
Isometric/Orthographic Shapes Project


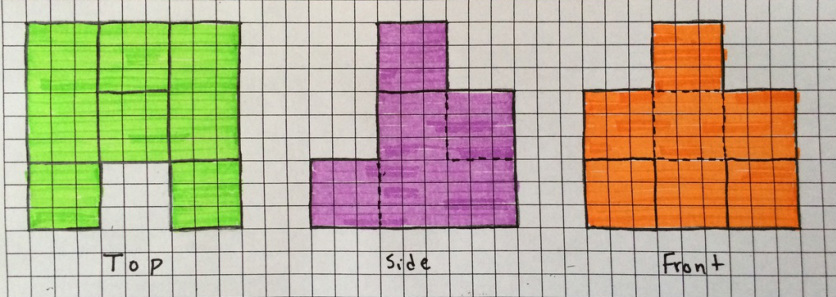
Orthographic top, Side, and Front
3-D Anamorphic Drawings
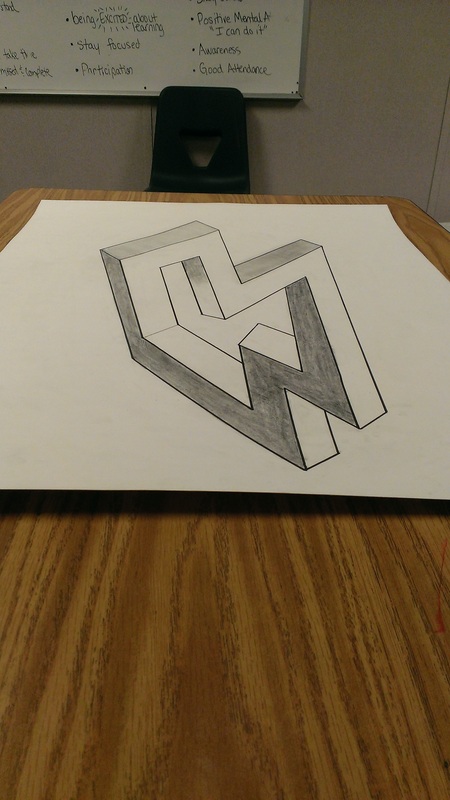
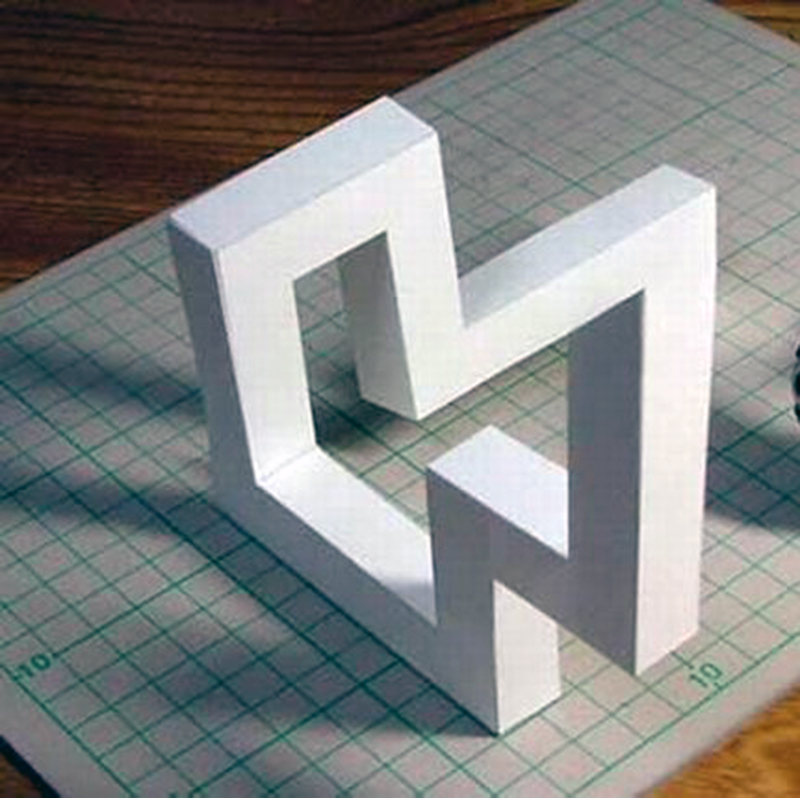
1. My definition of anamorphic is an object that looks different from different viewing angles. For example, if you look at an anamorphic drawing from the wrong angle it will look elongated or stretched. This effect is caused because anamorphic drawing are meant to be viewed from one point to create the 3-D effect.
2. The supplies that we used to create our anamorphic drawing are poster board, clear plastic, a shoe box, coins, and a pencil. The poster board was what we drew the shape on, the plastic was used to give our shape perspective, the shoe box held the plastic, and the pencil was used to drawn the shape.
3. My anamorphoic drawing is a result of projection because it was drawn from a point in space that was chosen and then the shape was “projected” on our paper through the clear plastic. We drew the shape flat on a clear piece of plastic, supported it with a shoe box frame and then drew points on our paper how they appeared through the plastic.
4. The only struggle we had making this shape was lining all of the points up through the plastic. The plastic was cloudy so it was hard to see through. We overcame this problem by double checking points. We are very happy with our final product.
Exploration of Trigonometry
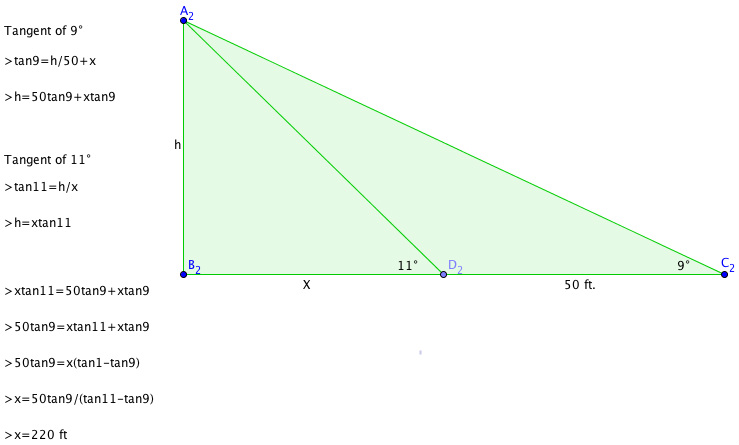
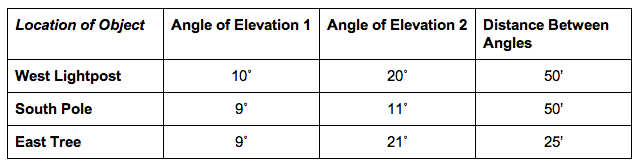
South Pole
We found the height of the object by using the equation h=tanΘ ∗ x. For the height of the we used South Pole we used the equation h=tan11˚ ∗ 220, which gave us the answer h=42.76 ft.
We found the height of the object by using the equation h=tanΘ ∗ x. For the height of the we used South Pole we used the equation h=tan11˚ ∗ 220, which gave us the answer h=42.76 ft.
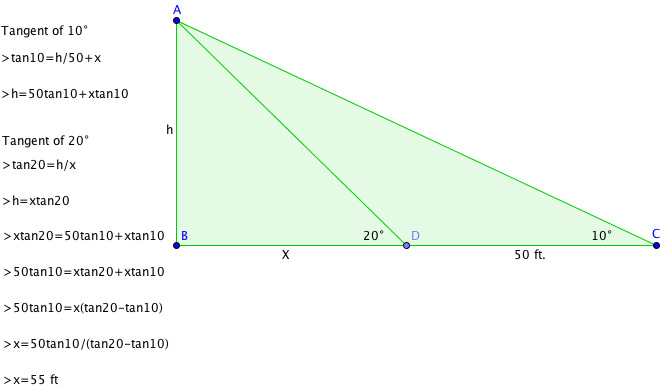
West Lightpost
We found the height of the object by using the equation h=tanΘ ∗ x. For the height of the we used West Lightpost we used the equation h=tan20˚ ∗ 55, which gave us the answer h=20.01 ft.
We found the height of the object by using the equation h=tanΘ ∗ x. For the height of the we used West Lightpost we used the equation h=tan20˚ ∗ 55, which gave us the answer h=20.01 ft.
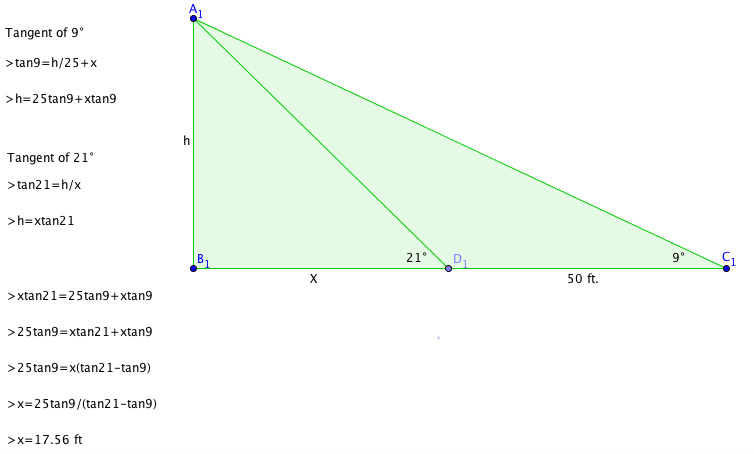
East Tree
We found the height of the object by using the equation h=tanΘ ∗ x. For the height of the we used East Tree we used the equation h=tan21˚ ∗ 17.56, which gave us the answer h=6.74 ft.
Tables for Locations
We found the height of the object by using the equation h=tanΘ ∗ x. For the height of the we used East Tree we used the equation h=tan21˚ ∗ 17.56, which gave us the answer h=6.74 ft.
Tables for Locations
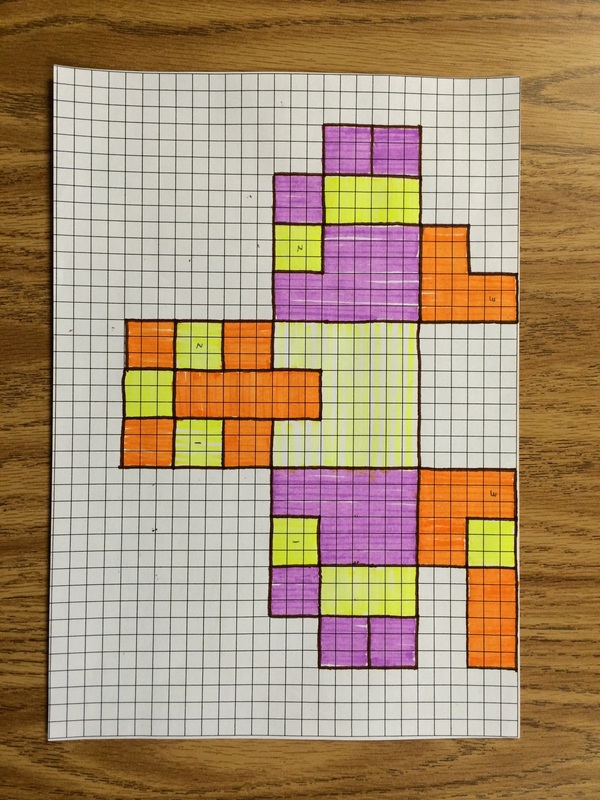
Hexaflexagon
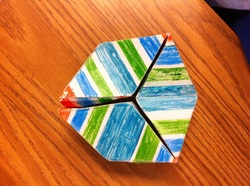
In my hexaflexagon project, I used both rotational symmetry and line reflection. When I was creating my design, I reflected different patterns to create a nice overall design. As you can see in the picture beside, the patterns I created are able to reflect across a line onto each other, my designs contain rotational symmetry when the hexaflexagon was flexed.
One design feature that I am proudest of on my hexaflexagon is the use of simple lines and colors throughout the hexaflexagon. The simple lines made the reflections and rotations easier to identify, and created a visual pleasing image when you rotate the hexaflexagon. If I were to make any refinements to my piece now that I understand the line-reflection and rotational symmetry concepts, I would add more shapes and be precise when creating the lines on my hexaflexagon. I believe that if I used these two ideas my hexaflexagon would be even more visually pleasing than before. One thing that I learned about myself from this activity is that I am a very visual learner. I learn best when I'm able to work with and create hands on projects such as the hexaflexagon. This hands on learning gave me a clearer understanding of reflections and rotational symmetry, and I feel I benefited from this activity greatly.
One design feature that I am proudest of on my hexaflexagon is the use of simple lines and colors throughout the hexaflexagon. The simple lines made the reflections and rotations easier to identify, and created a visual pleasing image when you rotate the hexaflexagon. If I were to make any refinements to my piece now that I understand the line-reflection and rotational symmetry concepts, I would add more shapes and be precise when creating the lines on my hexaflexagon. I believe that if I used these two ideas my hexaflexagon would be even more visually pleasing than before. One thing that I learned about myself from this activity is that I am a very visual learner. I learn best when I'm able to work with and create hands on projects such as the hexaflexagon. This hands on learning gave me a clearer understanding of reflections and rotational symmetry, and I feel I benefited from this activity greatly.
Snail Trail Graffiti Lab
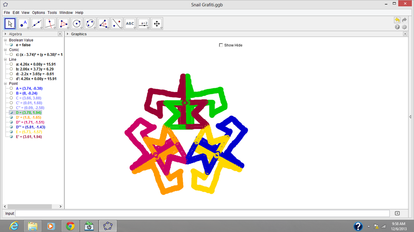
To complete this lab, we used concepts on rotation and reflection. As you may notice in the visual piece of the lab, the different colored parts are reflections or rotations of each other. These shapes contain line symmetry, and all are able to rotate around a point located in the center. Sometimes parts of the shape contain both reflections and rotations in the same translation.
During the process of creating this lab I learned that, as I mentioned in the 'Hexaflexagon' section, sometimes I learn best through visuals and creation of concepts. For me, this was the first GeoGebra lab we've done where we were able to bring geometry concepts to life in colorful and interactive designs. Although my learning curve on GeoGebra hasn't been lightning fast, this project warmed me up to the idea of conceptualizing ideas through technology, and opened a new perspective for me on learning by looking.
During the process of creating this lab I learned that, as I mentioned in the 'Hexaflexagon' section, sometimes I learn best through visuals and creation of concepts. For me, this was the first GeoGebra lab we've done where we were able to bring geometry concepts to life in colorful and interactive designs. Although my learning curve on GeoGebra hasn't been lightning fast, this project warmed me up to the idea of conceptualizing ideas through technology, and opened a new perspective for me on learning by looking.
Two Rivers Geogebra Lab
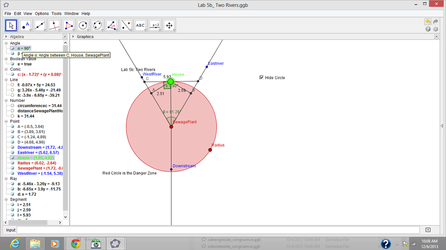
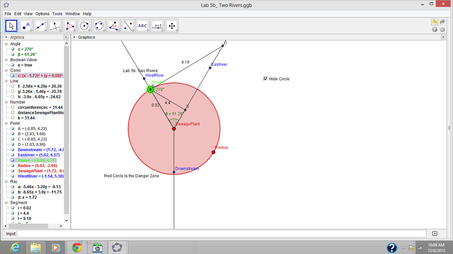
There is a sewage treatment plant at the point where two rivers meet. You want to build a house near the two rivers (upstream from the sewage plant, naturally), but you want the house to be at least 5 miles from the sewage plant. You visit each of the rivers to go fishing about the same number of times but being lazy, you want to minimize the amount of walking you do. You want the sum of the distances from your house to the two rivers to be minimal, that is, the smallest distance. In GeoGebra we created a sketch following these instructions. The below images are screenshots of the labs.
The scenario pictured beside would not be correct because the distance from the House to point A on the West river plus the distance from the House to point B on the East river is not equivalent to the shortest possible distance. This location satisfies the requirement that the house must be out of the sewage zone, but does not meet the requirement for the shortest possible path.
The scenario pictured below would be the correct answer because the distance from the House to point A on the West river plus the distance from the House to point B on the East creates the shortest possible distance. This location satisfies the requirement that the house must be out of the sewage zone, and also meets the requirement for the shortest possible path.
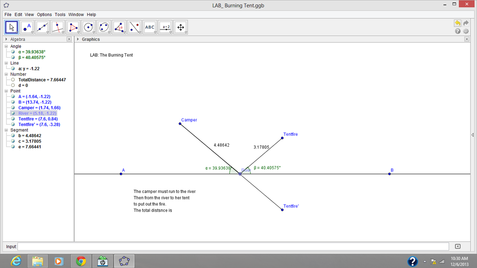
Burning Tent Geogebra Lab
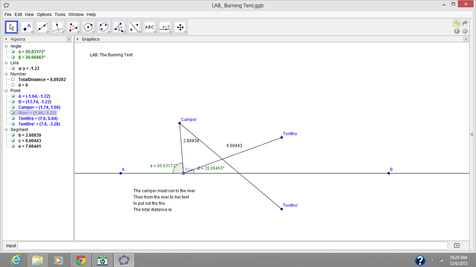
A camper out for a hike is returning to his campsite. The shortest distance between him and his campsite is along a straight line, but as he approaches his campsite, he sees that her tent is on fire! He must run to the river to fill a bucket of water, and then run to his tent to put out the flames. What is the shortest path he can take? In this exploration we investigated the minimal two-part path that goes from a point to a line and then to another point. This lab explored concepts learned from earlier GeoGebra labs using point > line > point ideas, but used a real example that solidified the ideas for me.
The scenario beside would not work because the segment between the camper and River does not lie on top of the segment between the Camper and TentFire', which is important when determining shortest distance. Also, the incoming and outgoing angles are not equivalent, which is another indicator that the distance traveled would not be the shortest in this scenario.
The scenario below would work because the segment between the camper and River lies on top of the segment between the Camper and TentFire', which indicates that point River does not need to be moved on line AB. In this instance, the incoming and outgoing angles are equivalent, which is another indicator that the distance traveled would indeed be the shortest distance in this scenario.